Brightening up the Dreary Days

dyedhair1It’s January, and in Salt Lake City that means colder air trapped in the valleys by high pressure areas leaving us stewing in our own pollution juices, as it were. A 10 minute drive up one of the many surrounding canyons would reveal sunny skies and warmer temperatures, but down here in the valley the air is thick with gunk and the sun won’t shine through the inversion.

So, what is a color-starved girl to do aside from dreaming of her future garden? Well, I dyed my hair. Not all of it, just a little bit. This is the first time I’ve done anything remotely like this, but I finally have a hair stylist that I trust, so I let her bleach and dye away (my hair is dark enough that it won’t really take dye without a bleaching first, which is why I’ve never done it before).

dyedhair2When my hair is down it peeks out just a bit, but when it’s pulled up it shows much more brightly. The color changes a bit with the light. Sometimes it’s much more purple and sometimes it’s quite pink.

My inner goth girl is sooo happy! I have purple hair and black fingernails and I wear leather boots every day 🙂 It’s also just in time for a trip to Southern California, where TNNA awaits.

I love it!
M

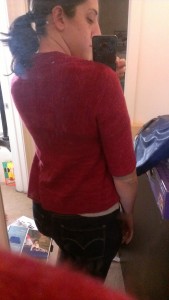
With a trip to Long Beach just a couple weeks away I started to think about what I would wear and decided I should make the time to sew a dress, I have fabric and pattern for both Crepe and this lovely pocketed sleeveless number from Butterick, but I decided I wanted something that would take a bit less work to make fit nicely (I’m learning to alter sewing patterns, but not quite proficient yet). So I went with Tiramisu, the first offering from Cake Patterns since it’s a knit fabric and a little less fussy to fit.

And about a year ago, I purchased an extra long twin jersey sheet set on clearance from Target for about $6. So I cut out the elastic band on the fitted sheet, washed the whole lot, and used the yardage to make the dress. I got all the pieces cut from the fitted sheet and a bit of the pillowcase, so I still have the whole top sheet to play with. I think I might make a t-shirt with it, or perhaps do some Alabama Chanin style work on a skirt.

I did make a couple of mods. Once I seamed it up, I found that the underbust area was a bit too tapered for me. I have a lot of bosom, but a relatively small underbust, so I just re-sewed the side seams a half inch further in on both sides. And when I put it on after that I realized that my short waist made the bottom of the waistband fall just a little low, so I took out that seam and brought it up about a half inch too. In the end I decided to hold off on hemming it. It’s a light enough jersey it doesn’t strictly NEED a hem, and I like the way it’s flowing, which might be changed by a hem.

Looking at it critically, I probably should have done just a bit of full bust alteration that Steph suggests. But since I definitely plan to make this dress again, I’ll play with it at that point. It’s super comfy and I’m going to wear the hell out of it!

M

‘Dicey’ Socks

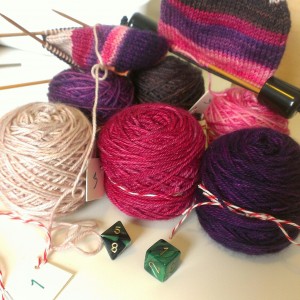
Dicey SocksA while back I couldn’t help myself and ordered one of Cephalopod Yarns’ Mini Skein Palettes. I got the purple/pink combo and after a bit of pondering came up with a plan.

I’m knitting stripey socks. But with the stripe pattern being determined by the roll of some dice.

You can read all about it here on the Ravelry page for the project.

I labeled each of the mini skeins with a number. There are 6 of them, so I’m using a 6-sided die to pick which color comes next, and figured I didn’t want each stripe to be more than 8 rows in a stripe, so I’m using an 8-sided die to pick the length of the stripe!

So far they’re really fun, but also an exercise in letting go. There are times when I want to re-roll because I think stripes of the same color are too close, but I’m pushing through that desire. I’m trying to make them a true exercise in embracing the random.

Miriam

Gearing Up

My knitting these days has been a little frenetic and unfocused. I took some time off work knitting to do gifts for the holidays, and I haven’t yet gone back to work knitting. I’ve got another sweater pattern to clear off the decks before I really jump back into designing (Village Green was the first in case you missed it earlier), and then I ought to get back to swatching and sampling, and playing around with design concepts.

Bramble ShawlI have made some really great sample projects for display at the LYS, including my Bramble Shawl in Classic Elite Vail — which is such a luscious yarn that I can’t help but rub it on my face every time I pick it up — and an Oblique Scarf in Elsbeth Lavold Silky Wool. I knit two Urchin hats (a free pattern from Ysolda)… one for the shop and one for me.

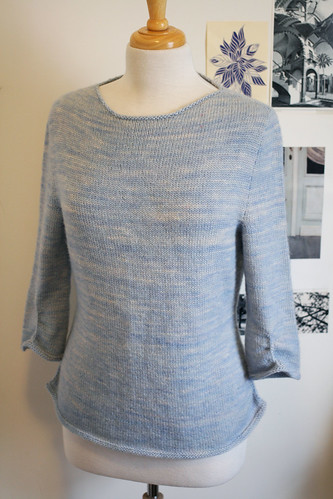
Wispy CardiThere has been some purely selfish knitting too. I finished Wispy Cardi by Hannah Fettig for myself this week, but haven’t worn it yet. The long stretches of stockinette were perfect for my holiday knitting. The yarn is Malabrigo Lace, which will probably pill quickly and not wear very well at that gauge, but I had it in my stash, and I liked the color and frankly, just wanted to knit a sweater for which I didn’t have to do math 🙂

Oh, and I started a Pinterest Board for my 365 | Year of Making Project if it’s easier for you to follow along that way. I would love it if someone else wanted to start one too! You could start February 1st!

Mwah! Love you all!
Miriam

p.s. In case you missed it, don’t forget to check out the Project Bag Swap I’m running! Due date is March 15th (The Ides of March!). Check it out!

Project Bag Swap!

20130103-210028.jpgI’ve been sewing quite a bit. In fact I’ve accumulated a rather large selection of scraps from all the project bags I’ve been making to sell at my LYS and as holiday gifts. The project bags are great, made using two fat quarters and double thick with a nice grosgrain drawstring. I even went through the other day and picked out a couple colors and used just the scrappy bits to make a pieced pincushion. But there are never enough project bags, right? Even if you’re a one project knitter, there are always the next projects waiting in the wings, or maybe you need one to keep your mending from being played with by four-legged housemates, or maybe you just need a nice bag to take your makeup on a trip. So here’s my proposition…

hextut4Let’s have a swap! Everyone make a project bag (or two or three), and send it(them) to me. I will switch them around and send them back to you. If you sent more than one you will get the same number in return. They can be drawstringed, zippered, etc… but please, no velcro. Velcro and yarn and not good friends. Get creative, use up some scraps by making a patchwork bag. Let’s just make it at least large enough to hold a pair of socks or a small shawl. It can be bigger if you feel inclined, but any bags that wouldn’t at least hold a pair of fingering weight socks will be returned un-swapped. Get them to me by March 15 and they’ll be included in the swap.

The Rules:
Tag each bag you send with the maker’s name or internet handle. You may also want to include the fabric information (designer/line), or care instructions. It would be appreciated if they were all washable. I know I get my project bags fairly dirty dropping them on trains and stowing them in the footwells of cars or shoving them into my bag. Please attach this information to the bag by tying it on or pinning it with a safety pin (no straight pins please).

Postage + Envelope:
US participants need to include a self-addressed, postage-paid, large First Class Envelope. You will have to provide your own Self-Addressed Stamped (Non-Priority) envelope. If you’re only swapping the one bag, it probably won’t weigh more than 8 ounces. Postage for a first class envelope of 8 oz is $2.80. If you’re swapping more than one bag, you should send your postage paid envelope with max for first class parcels of 13 oz. ($3.75). I will make sure all packages stay under 13 oz. so that your postage is covered. You will have to purchase the stamp(s) to cover this. To be sure you receive your package, I require first class envelopes only.

Non-US swappers, the only way for me to collect postage fees from you is PayPal. I expect packages to weigh under 10 oz., so postage should be between $4 and $8, depending on where you live. You must include your email address ON the outside of your package, with your address, so that I may email you for your postage fees. If you don’t, I won’t be able to contact you and send your package back.

Any project bags received by March 15th will be swapped. Any bags received after that date will be returned un-swapped. Please mail them to:

Miriam Felton
PO Box 1764
Salt Lake City, UT 84110

I’d love to see everybody post progress photos, or the fabric you’re using. If you’re posting on twitter or Instagram use the hashtag #BagSwap, and I’ve started a thread of Ravelry if you want to discuss patterns or materials.

ETA 1/16/2013:
FYI for the Local (SLC or Northern Utah Area) Folks!

If you want to save on postage, Black Sheep Wool Co will be serving as a drop off point for the Project Bag Swap! The deadline still applies. I need to have the project bags AT BSWCO by March 15th to be in the swap. Please still tag your project bag with your contact info, and include another tag with your contact info to be attached to the bag you get back. The swapped bags will be taken BACK to BSWCO for you to pick up.

If you want to drop it off instead of mailing it in, but have the new bag mailed back to you, then include your return postage envelope like originally instructed.

Thanks everybody!

Village Green Pullover

Purchase the pdf file now through Ravelry (you don’t have to be a Ravelry member to purchase)
| add to cart | show cart

VillageGreen1

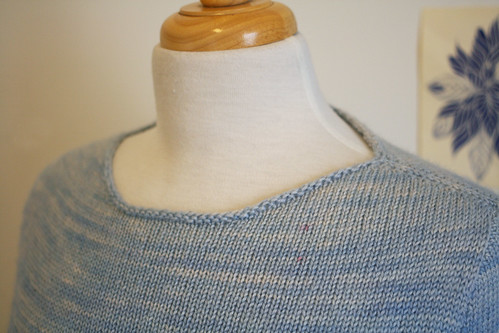
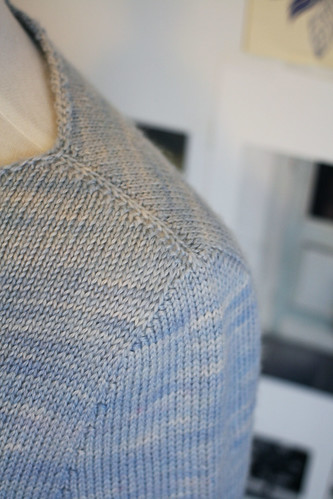
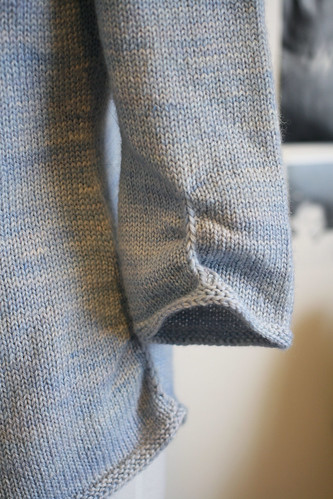
This top down, seamlessly worked sweater has an ingenious set-in sleeve construction, and subtle waist shaping. It also features a ruched sleeve detail and ruching at the hem, which gives it a shirtwaist look at the bottom.

VillageGreen2

This sweater is worked seamlessly in one piece from the collar down, but unlike the raglans you may be familiar with, this sweater features a flattering capped sleeve. Some techniques may be unfamiliar to you, but are clearly explained in the body of the pattern. You will use short row shaping over the first few inches to shape the front neck. The shoulders are created using the contiguous sleeve method developed by Susie Myers, SusieM on Ravelry.

The decorative ruching on the body and sleeve is created after the knitting is complete by dropping stitches then chaining them up. A video tutorial link of this process is provided in the pattern.

This sweater is designed to be worn with 0-1 inch (0-2.5 cm) of negative ease. The narrowest point of the sweater should hit at the natural waist. Sweater is shown in 36 inch finished size on a 36 inch bust.

VillageGreen3

Yarn: 700[800, 900, 1000, 1100, 1200, 1300] yards of DK weight yarn. Sample shown in Wooly Wonka Fibers Freya DK (100% BFL Wool, 325 yds per 125 g skein) in ‘Wisp’; 15 wpi.
Needles: 3.75mm (US 5) circular needles or size needed to obtain gauge. You will need a 16-inch circular, a 24-inch circular, and your preferred method for working smaller circumference for the sleeve (see note). For the larger sizes, you might also prefer a 32-inch needle to work the majority of the body. And your preferred method for working smaller circumference for the sleeves (see note).
Gauge: 24 stitches & 32 rows in 4 inches (10cm) square in stockinette stitch after blocking.
Finished Sizes: XS[S, M, L, 1x, 2x, 3x] corresponding to bust circumference of 28[32, 36, 40, 44, 48, 52] inches (71[81.25, 91.5, 101.5, 112, 122, 132]cm). For specific measurements, see schematic.
Notions: Five stitch markers, plus one that looks different for the beginning of round, scrap yarn to hold live stitches, tapestry needle to weave in ends, crochet hook in size H, I, or J.
Pattern Includes: Written instructions and links to video tutorials.
Stitches Used: knit, purl, k2tog, ssk, m1, kfb, kfpb (knit into the front and purl into the back of next stitch), pfkb (purl into the front and knit into the back of next stitch), wrap & turn short rows with detailed instructions, various cable stitches with detailed instructions, use of markers, slipped stitches.

VillageGreen4

Purchase the pdf file now through Ravelry (you don’t have to be a Ravelry member to purchase)
| add to cart | show cart

Fearless Knitting for Local Folks

Cont. Ed Spring Catalog

A few months ago I was asked to propose a class for the University of Utah Continuing Education Program for knitting, what I’ve come up with is being offered beginning January 24th and called Fearless Knitting. It’s gonna be a really great class that covers not only the basics of how to knit and purl, various increases and decreases, but discussion on material choices to get the finished piece you want, how to read a pattern, how to fix mistakes, and how to use the many resources available for knitters online.

Even if you already know how to knit and purl the class would still be a great way to grow your skills.

If you’re in the Northern Utah area or know anybody who is and would be interested, you can sign up through the Continuing Education page or through the regular class catalog. If you’ve never taken a Cont. Ed class from the U, you pay the one tuition for the whole term and then you can take all the classes you want during that term and just pay the special fees. There’s some other really great classes I’m thinking of taking including Letterpress, The Art of the Macaron, and Bee Keeping.

I’d appreciate any help you can give in spreading the word about the class, it’s my first time teaching with Cont. Ed. and it would be great if it goes well so they keep me on in the future 🙂

Cheers!
Miriam

Welcome to 2013!

Looking forward to the new year I have a few goals, not the least of which is to use this space more. Writing is a muscle that I’ve not exercised very well in the last year, and I’m feeling the lack. So here they are… 2013’s goals:

1. Blog regularly
2. Make cheese
3. Learn to play the guitar I saved up for and bought 8 years ago
4. Sew clothing, especially everyday pieces
5. Make a soufflé
6. Learn Illustrator

I also have some less-specific general areas to work on, like this year I want to give myself permission to play. I’ve been programmed so long that work & play are entirely separate that I feel somehow subversive to be loving what I do. The nature of creative work is different. We have to spend time feeding our creative coffers without the pressure to produce, or we face burnout and despair.

So in the playing vein, I have plans to read all (and most likely swatch through) Principles of Knitting and a couple other books with really intriguing techniques with which I want to play around, and I’ll be talking more about all my creative endeavors (not just knitting) here on this blog.

20130103-210007.jpg 20130103-210021.jpg 20130103-210028.jpg

I’ve also started a 365 Project I’m calling “Year of Making” (days 1-3 shown above). I’ve started and failed at doing a 365 Project 3 times, but I think the Making focus will make it easier this time since it doesn’t require any self portraits, as will the great camera on my cell phone and instant uploading to photo sharing sites like Instagram (scroll down to the bottom of the page and click the cute camera icon to follow me there).

I hope you’ve got some good goals for the new year, and that you’ll be a part of my 2013.

M

Best discount of the year of Craftsy Classes

Poor, neglected blog. I’ve been a bit crazy prepping for a holiday season that I’ll be spending at someone else’s house, taking care of a new cat (all hail Stormageddon, Dark Lord of All), and trying to get some creative mojo back with much sewing and preparatory winter nesting.

I have a goal to blog more (or… you know… at all) next year, and there’s some great stuff I did this year that I can talk about soon, but I wanted to let you all know about the best pricing of the year on Craftsy classes. Starting today (Saturday, December 22) through midnight on December 24th, you can get my Craftsy class for $14.99! That is an amazing deal! And if you’ve been thinking about taking it, but haven’t been sure, now is the time to sign up. You’ll save some $$, and taking the class can be part of your New Year’s resolutions 🙂

Craftsy Holiday Sale: All online classes up to 75% off. Sale ends Mon. Dec. 24th, at midnight!

If you’re already a fan of the Craftsy platform, you can get discounted prices on a bunch of other great classes too! I’ve been taking the “Sewing with Knits” class and I’ve signed up for “Artisan Cheese Making” and “The Couture Dress” to help with my New Year’s goals… make my own cheese and sew more clothing.

If you’re interested, click through and check out the class lists 🙂

M

Paper Pieced Project Bag Tutorial

I’ve been doing a bit of sewing in my spare time and I’ve taken up English Paper Piecing. I got my supplies from PaperPieces.com on a recommendation from Cauchy. I got some 1″ hexagons all precut and ready to go, and I got the super handy acrylic template that has seam allowance and everything. So I just used my rotary cutter to cut a bunch of hexagons out in a few quick motions.

Anyway, here’s a turorial for the project bags. I’m keeping my knitting in them 🙂
hextut2
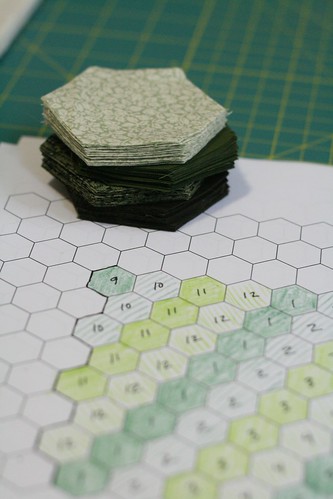
1. So first, come up with a plan. You can print out hexagon graph paper here. The first bag (the blue one) I did a bit ramshackle… I wasn’t sure exactly how big I wanted it, and I just did a random placement. But being a little bit over-planny, for the second one (the green one) I calculated how many hexies I would need for this project and cut only that many. YMMV.
hextut5

hextut6

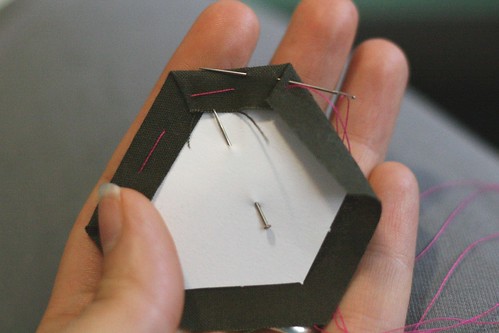
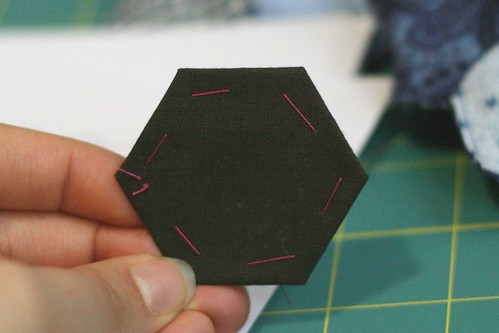
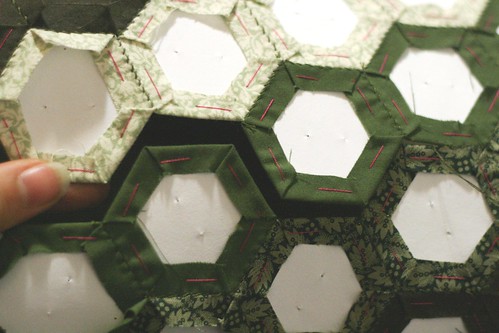
2. When all your pieces are cut out, start basting the fabric around the paper. Pin the fabric and the paper together, then use a high contrasting color thread to do some quick basting stitches all the way around. Remove the pin. Do this until you have all the paper pieces you need basted up with fabric. I kept mine corralled in berry baskets. 🙂
hextut8

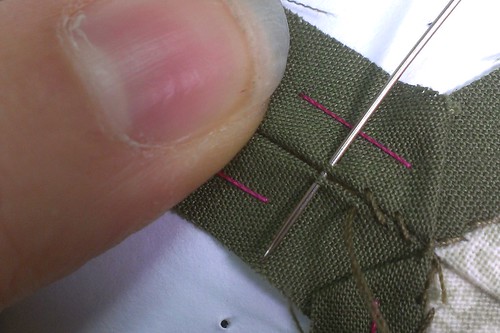
3. Stitch all your fabric covered paper pieces together, catching just the very edge of the fabric. You don’t want to bite too deep into the side or you’ll sew through the paper instead of just the fabric. Make sure that if you graphed out your design that you’re piecing the hexies in the right pattern order.
hextut10

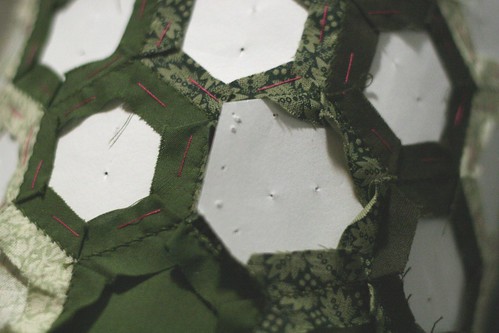
4. When you’ve got a sheet of your hexies all pieced together, turn it into a tube by stitching one narrow end to the other. If you did each row of hexies the same number of hexes wide, then the ends will interlock perfectly.
hextut11

5. Remove your basting stitches and take out the paper. I find it helpful to do the paper at the top and bottom of the tube last so that I can iron it with the paper still inside to get crisp points. Just slide the whole tube with the paper still inside the edge hexies over the tapered end of your ironing board and press it in sections. When all the paper is removed, you’re left with an inside out tube of fabric hexes all pieced together.
hextut13

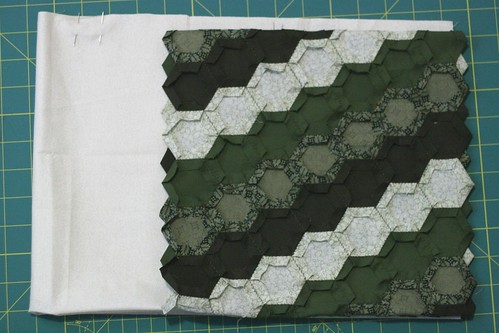
6. Cut your top/lining fabric to the correct width (the width of the hexie tube plus seam allowance) and to the right length. Determining the length is a little tricky… but give yourself seam allowance at the bottom so that the end will hang out just inside the most indented corners of the bottom edge, and give yourself enough overlap at the top to fold down for the top/outside edge of the bag plus some to which you will sew the top row of hexes.

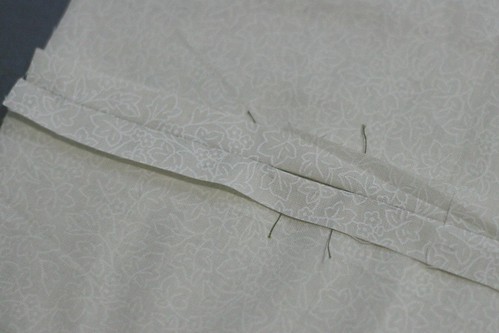
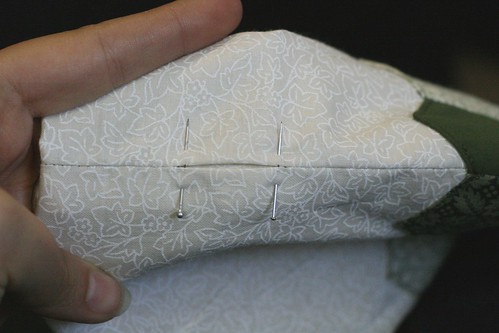
If you look at the light fabric on the left, you’ll see it’s folded over, (this will be the outside top portion), and you’ll see two pins. Place those pins on the folded over section only at the place you want the drawstring channel to sit. Mine starts about 1.5″ from the fold. The gap between the pins needs to be a little bigger than the size of your drawstring ribbon so that the ribbon can slide easily in the channel.
hextut14

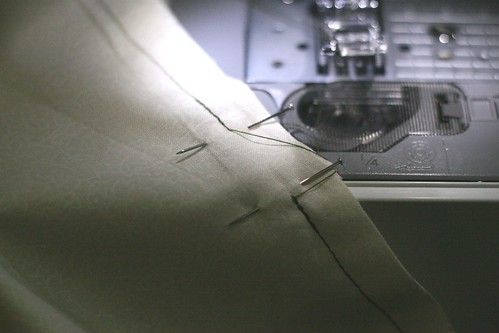
7. Sew across the bottom edge of the lining fabric, turn the corner and seam up the long side, but leave a gap between the two pins as shown in the photo above. Seam from the other side of the gap to the end.
hextut15

8. Iron the seam allowances out so you can see the gap.
hextut16

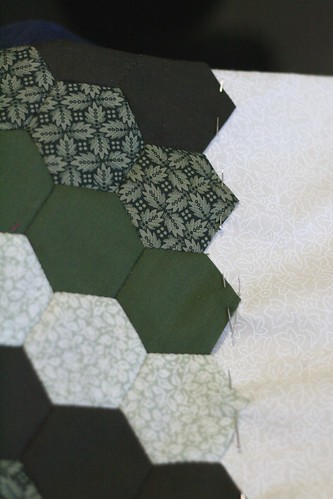
9. Turn the lining tube right side out and pin one end of the hexie tube to it. Be careful here as the hexies will stretch, but the lining tube won’t. So make sure you pin, pull the lining tube taught and then repin if needed.
hextut17

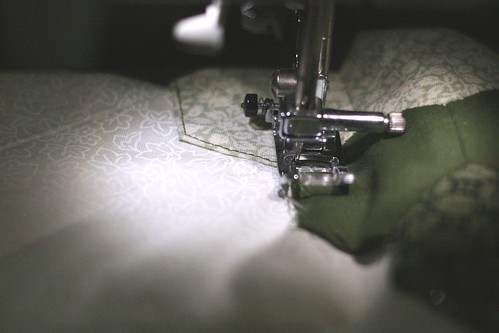
10. Topstitch the hexie tube to the lining tube all the way around. If you’re doing a particularly small bag, or smaller hexies, this may be easier to do by hand. The blue bag was smaller and it just barely fit on my machine to do this.
hextut18

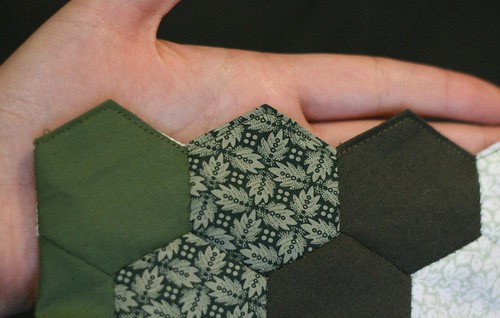
11. Pin the bottom end of the hexie tube together and top stitch those hexies to each other to make a picot bottom edge.
hextut19

12. Turn the inside half of the lining tube to the inside and get it as far down into the hexie tube as you can with it still laying flat. As you do this, make sure that your seam allowances still face out so that your channel gap for the drawstring is open to the inside lining fabric like in the photo above.

Pin both sides of the opening and top stitch to make the channel.
hextut20

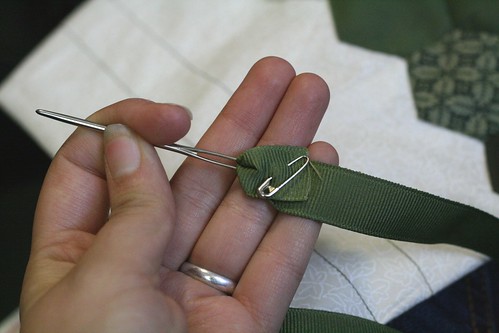
13. Thread your drawstring ribbon through the channel. If you don’t have one of those handy flexible drawstring threaders you can use a large, blunt yarn needle and a small safety pin. Just thread the ribbon through the yarn needle and pin it to itself and thread it through the channel. Tie an overhand knot in the two ends of the drawstring and trim at an angle.
hextut21

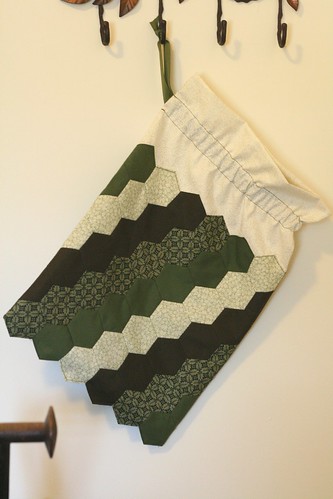
Voila! Hexie project bag. I’m planning on using other layouts of paper piecing and doing more for gifts and for myself. It’s a great way to use up scraps of fabric too!

p.s. If you want to avoid the picot edges, you can buy half six point diamonds to cover with fabric and fill in the bottom and top edges of the hexie tube. Then top stitching and the seam along the bottom will be much easier.