Lace Structure Tutorial: Part III, Patterning on WS Rows

In this tutorial I hope to help you understand how the placement of yarn overs and decreases and which yarn overs and decreases you use will change the lace’s structure.

*Note* For all of these charts, the legend can be found here.

If you missed it, click here for Part I: Directional Decreases or here for Part II: The Shape of the Fabric.

Part III: Patterning on WS Rows

In all of the previous swatches, the patterning has only been on the right side rows. So what about patterning on the wrong side rows, eh?

Swatch 12

Chart 12 Swatch 12

This is the same basic pyramid as Swatch 1, but we’ve removed the non-pattered WS rows to make patterning on every side. As you can see, the pyramid is completed in fewer rows and the angle of the line of decreases is more steep.

When working in the round, patterning on every side is easy because you are looking at the right side of the fabric at all times. But when you are working flat, it gets tricky.

Charts are usually made to look like a pictorial version of what the finished piece should look like from the Right Side. That is why a left leaning decrease is a left leaning line and a yarn over looks like a round hole. If you will notice in the chart above, the decreases on the wrong side rows (2, 4 & 6) still look the way they will look when you view the piece from the right side of the fabric, but when you work them, you have to work them in a different way to make them appear correctly on the RS. If you worked a k2tog on the back of the piece, it certainly wouldn’t look like a k2tog when you flipped it back over to the RS.

But because knit and purl are just opposites (a purl is a knit when looked at from the other side and vice versa), you can still work decreases on the WS that will be the same as the RS decreases when viewed from the RS. In fact, each decrease has its WS counterpart. Some of them are easy to remember and easy to work, while some are more complicated and tricky to remember. But here’s a table for reference.

For the table, the Right Side shows the stitch as it is worked on the right side, in the Wrong Side column, it shows the equivalent stitch to be worked on the WS to equal the RS stitch.

The stitch position column for the double decreases assumes that you are counting stitches from right to left on the RS of the fabric so the first one you encounter as you are knitting is 1, the next is 2, etc…

Decreases Table

Clearly, some of these will hardly ever be used by the average knitter, but try out some swatches some time and see what you find.

A Note about Twisted Stitches.

I cannot finish this tutorial without addressing the issue of twisting stitches. Mary Thomas’ Book of Knitting Patterns says that each slipped stitch in a decrease must be slipped as if to knit or else they will be twisted. You will also notice that I have included an “easy out” for the single decreases on the table above. These are decreases that will give the correct directional leaning, but are not truly the reverse of the RS decrease. A P2tog tbl, while faster to work than the given decrease, twists the stitches in the process of decreasing them. While there is nothing inherently wrong with twisting stitches, the problem arises when you block the finished piece. Especially with lace, if you have a twisted decrease paired up with a non-twisted decrease, the lines created in the final lace WILL NOT BE THE SAME. They won’t block out to look the same and for myself, they would drive me crazy! If you were using these decreases in a sweater that wouldn’t be blocked severely then it wouldn’t make such a difference, but with lace, it becomes more obvious because of the larger needle size, space between strands of yarn and the blocking process.

For this reason, I disagree with many designers that a k2tog tbl can be used as a left leaning decrease in place of an ssk or sl1, k1, psso. Twisting stitches fundamentally changes the tension in a piece of knitted fabric. By twisting a stitch, it stands out more from the work, the stitches around it are pulled in ways they would not be if the stitch wasn’t twisted, and the twisted stitches (and the area around them) will block differently than the non-twisted decreases.

Knowing the different ways to manipulate stitches will seriously increase your understanding of your knitting. And when you understand the way the yarn moves to create the stitches and the variations that are possible, it’s much easier to adapt a pattern, tweak some shaping, and design something from your imagination than it would be otherwise.

I hope you’ve enjoyed this tutorial. I’d love your feedback in the comments.

Click here for Part I: Directional Decreases
Click here for Part II: The Shape of the Fabric

Lace Structure Tutorial: Part II, The Shape of the Fabric

In this tutorial I hope to help you understand how the placement of yarn overs and decreases and which yarn overs and decreases you use will change the lace’s structure.

*Note* For all of these charts, the legend can be found here.

If you missed it, click here for Part I: Directional Decreases

Part II: The Shape of the Fabric

Swatch 9

Chart 9 Swatch 9

With Swatch 9, we have a single column of yarn overs, paired with decreases that are right beside them. The swatch is square with no biasing. Now watch what happens when we move the decreases.

Swatch 10

Chart 10 Swatch 10

As you can see from the chart, the yo column is in the same place and we have simply moved the decreases 3 sts to the left. But look at what happens to the fabric. The stitches between the increases (yo’s) and the decreases are slanting to the left. Think of it this way. When you work a yo (or other increase) it adds one stitch to the sum total of stitches in the fabric. When you work the decrease, it subtracts one stitch from the sum total and cancels out the increase. But for those 3 sts between the increase and decrease on this swatch, there is an extra stitch in the fabric (until the decrease is worked to cancel it out).

Now let’s take another look at Swatch 3 from the previous installment.

Swatch 3

Chart 3 Swatch 3

When we look at this again, we can see that the fabric is beginning to bias. This is because the increases and decreases are not next to each other. Take Row 1 of this chart for an example. The increase is worked (yo) and then 3 sts are knit before the decrease is worked. But this decrease doesn’t just cancel out the first increase. This decrease is a DOUBLE decrease, cancelling out the other increase that hasn’t even been worked yet. So the stitches on BOTH sides of the double decrease face in toward it, which puts more strain on the stitches closest to the increase and less strain on the stitches closest to the decrease. This is what creates the biased point at the bottom of the swatch.

Swatch 11

Chart 11 Swatch 11

When we move the decrease to the opposite side of the swatch from the increase, we get a whole swatch of biased fabric. When forced to be square, the stitches in the swatch lean to the left, toward the decreases and away from the increases. However, when left un-squared, the biased swatch looks like this.

Swatch 11-alternate

The majority of the stitches WANT to be straight up and down. So the swatch shifts the minority stitches to fit the energetic movement of the majority of stitches.

So a good general rule of thumb to remember is that WHICH decrease you choose creates the lines in your lace, while where you place the decreases creates the movement in the stitches.

Click here for Part I: Directional Decreases
Click here for Part III: Patterning on WS rows

Lace Structure Tutorial: Part I, Directional Decreases

In this tutorial I hope to help you understand how the placement of yarn overs and decreases (and which yarn overs and decreases) you use will change the lace’s structure.

*Note* For all of these charts, the legend can be found here.

Also, for clearer pictures of the charts or the swatches, click on them to see enlarged versions.

As discussed briefly in Part II of the lace design tutorial I posted a few weeks ago, with some exceptions, each increase in lace (usually a yo) is paired with a decrease. There are a whole host of options when choosing decreases and they each make a difference in how the final lace appears.

Part I: Directional Decreases

Each decrease is given a “direction”, i.e. ssk is a LEFT-leaning decrease because when looking at the RS of the work, the stitch appears to lean LEFT. A k2tog is a RIGHT-leaning decrease because the stitches, once worked together appear to lean RIGHT. Some decreases lean neither left nor right, but go to the center such as a Centered Double Decrease or a Vertical double decrease which uses 3 sts, by decreasing one at each side and leaving the center stitch facing straight up as if it hadn’t been involved in the decrease at all.

Let’s look at some examples.

Swatch 1

Chart 1 Swatch 1

You can see with swatch one we’ve got a basic decreased pyramid thingy going on. Using decreases that lean in toward the center of the pyramid and AWAY from the increases (yarn overs). Decreasing AWAY from the yarn overs is what causes the line that you see. The lines on each side that emphasize the pyramid inside the yo’s are created by the decreases and specifically because they face AWAY From the yo’s.

Swatch 2

Chart 2 Swatch 2

When we make subtle changes we can get big results. By simply changing the decreases to face TOWARD the increases, we have removed the line completely. This makes the whole pyramid shape much less obvious and makes it lie flatter.

Swatch 3

Chart 3 Swatch 3

With this swatch we’ve swapped out 2 single decreases (2 single decreases at 1 stitch a piece = 2 total sts decreased) for one double decrease (2 total sts decreased). In this case, a sl1, k2tog, psso. You can see that this begins to change the shape of the fabric. We will cover that more in depth later in the tutorial, but for now, just keep it in mind. What I want you to see right now is how the pyramid still remains, but the decreases are now in the middle, with no clear line.

Swatch 4

Chart 4 Swatch 4

This swatch is the same as Swatch 3 except that we’ve replaced the sl1, k2tog, psso with a centered double decrease. This is accomplished by slipping 2 sts together as one as if you were knitting them and they were one stitch, then knitting 1 and passing both slipped stitch over AS ONE. If we look at the 3 sts of the decrease as being numbered right to left 1, 2, 3, then the center of the stitches is #2. You slip #2 and #1 together, knit #3 and then when you slip the first 2 sts back over the third, you end up with stitch #2 smack in the middle on top. This is what gives this decrease a distinct line up the center. That is Stitch #2 of the 3 sitting on top.

Swatch 5

Chart 5 Swatch 5

This next series of swatches illustrate what happens when directional decreases are stacked on top of each other rather than staggered like in the pyramid examples. In this example, you have directional decreases facing AWAY from the increases.

Swatch 6

Chart 6 Swatch 6

In this example, you have directional decreases facing TOWARD the increases, which, again, makes a smooth fabric without obvious decreases.

Swatch 7

Chart 7 Swatch 7

Here the decrease is changed to a double decrease and moved to the center of the double eyelet column. In effect this takes the stitches that were created by the increases and decreases those stitches back into the middle stitch. It makes the eyelets a little snugger in my estimation.

Swatch 8

Chart 8 Swatch 8

This is also a double decrease, but is a Centered double decrease specifically. In my opinion, this makes the smoothest fabric of all the previous swatches. No directional stitch is visible, even though they are present. The directional stitches are just hidden underneath the vertical stitch in the middle of the eyelet columns.

Click here for Part II: The Shape of the Fabric
Click here for Part III: Patterning on WS Rows

Blaaaaaaaaa……………..rgh… *gurgle* *sputter*

For some unexplained reason my upper respiratory track has become a general plague area. It started with a bit of a sore throat that felt like maybe my sinuses draining and now I can’t breathe through my nose at all and it alternates between so stuffed up my head feels like it’s going to implode and sudden (and very inconvenient) bouts of rushing snot that will not be stemmed by sniffing. I’m sure you can imagine how stressful this was on the train this morning.

Aha.. I have discovered that if I’m eating, then my nose is somewhat clearer… could that be because my ears can’t really get all funky when my jaw is working and that in turn makes my nose open? Is that even possible? I guess I’ll just have to keep stuffing my face and hope for the best.

M

Book Review: The Natural Knitter

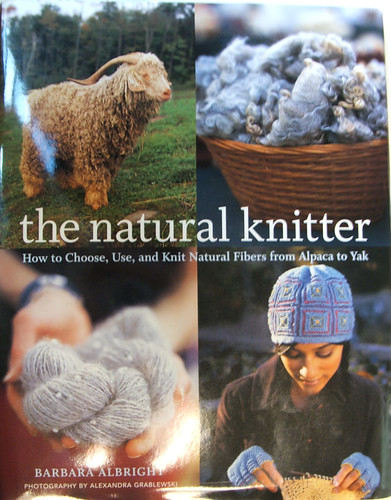
I got a copy of The Natural Knitter: How to Choose, Use, and Knit Natural Fibers from Alpaka to Yak” by Barbara Albright in the mail last week, so I thought I’d write a review as I hadn’t seen one in the blogs yet.

“The Natural Knitter” is a comprehensive tome on knitting with natural fibers. The book is separated into 5 Chapters — From Sheep to Wool; Camelids, Goats, Bunnies, Other Fiber-Bearing Beasties and Silk; Plants; Plant-Dyed Fibers; and Natural Next Steps.

Each of these chapters is PACKED with information. The Chapter on Wool talks about different breeds of sheep and the properties their wool imparts, while the chapter on camelids and other beasties tells you about the structure of each camelid fiber (why it’s good and what challenges need to be addressed when using it). Each chapter has great patterns that use the fiber in question to best advantage, and each pattern is accompanied by a brief history and description of the company or farm that creates the yarn used.

The whole book is visually stunning. The photography really highlights the textures of the fibers and the character of the animals they come from. The introduction goes into detail about what makes a fiber natural or organic, and discusses the level of organic-ness that each label indicates. The book does a great job of illustrating how much of a difference it can make to raise fiber or plants for fiber without pesticides and with an eye toward sustainability.

The chapter on plant-dyed fibers offers information on dying your own fibers using plant-based dyes, and discusses mordants and how to dye using onion skins. And for those of you who haven’t yet given in to the spinning bug, the final chapter discusses spinning your own fiber and how satisfying it can be to know where your finished garment comes from, from the plants the animal is fed to the skin on your back.

The patterns are all interesting and some of them have DEFINITELY made it to my short list of MUST KNITS.

It’s a beautiful book as well as being loaded with information. I’m really glad to make this book part of my collection.

M

Thanks everyone for the advice about postal services. I’ll give the USPS one more chance with Global Express mail (which is insured, so I bet they’ll keep better track of it), but if that goes astray, I’m switching to FedEx.

You know I was going to show you an FO sweater today, but the designer of the pattern was unhappy that I was going to post and has asked that I not. So… moving on….

I had a great time this weekend with Margene and Blogless Val (you know we’ll just keep calling you that until you get on the ball and GET A BLOG, Val! 😉 ) Margene has some great pictures of us at Solitude Ski Resort. It was a (REALLY) bright sunshiny day and the Huevos Rancheros at Silver Fork were just PERFECT.

I should have a review and a tutorial for you this week, but not yet, my little onions. I need time to edit the first draft before I post it.

Also, I can’t tell you how excited I am that Eunny Jang has been named the new editor for Interweave Knits! As Cara said, Eunny has raised the bar for the whole knitting world, and I am excited to see what her tenure as Editor will bring us 🙂 Good luck Eunny! And thanks so much to Pam Allen, and good luck for the future!

One more thing….

… does anyone know of a more reliable way to get parcels between the US and UK? The USPS really sucks and there’s no tracking or accountability. I’m open for recommendations.

M

Demeter Camisole named

Ariann is done, blocked and being worn, but photos will be taken this weekend when I have more time and posted on Monday. My computer at home is dead right now, with its guts all hanging out, awaiting a new motherboard and CPU, so I have no e-mail or internet contact all weekend.

But you all probably want to know what I’ve decided to name the camisole, right? The winning name was Teri‘s with “Demeter” I think it’s perfect and I have a deep love of mythology as you might have noticed. But since Teri is one of my local SnB girls, I didn’t want to appear to play favorites, so I also chose a random winner from the eligible comments using a Sandra! I’ve sent you an e-mail, so make sure you respond with your address and pattern choice!

You know, I’m always amazed at how many knitters come out of the woodworks to join a contest! Why don’t you people comment all the time! 🙂

Um…. I think that’s about it. Lots to do today, so I’d better get to it.

M


Opal has finished her Hidcote shawl and it’s just lovely! What a great color!

Melanie finished her Icarus shawl with so little yarn to spare that it nearly gave me a heart attack!

Kelli finished her Lightweight Mountain Peaks in a hand-dyed laceweight of blues and greens. It’s really beautiful!

ETA: And some of you might remember the covert mittens I was knitting a while back. Well, the book is almost ready, and you can preorder a copy and as a special, orders placed this month will have FREE ground USPS shipping to the US and Canada for the first copy, $2.00 per additional copy. So visit the book’s website to preorder!

Lost and Found

Three and a half years ago, I was attending Utah State University and my wallet was taken from my bag inside a classroom while I went to the bathroom. I checked every lost and found and had my cards all canceled (and incidentally found out which ones cancel your card and which ones just SAY they cancel your card). I slowly replaced everything that was in it, and thought no more about it. At least it was better than the time I was 17 and I lost my wallet while visiting my grandmother in San Diego. I had to have my family fedex me copies of my birth certificate and social security card so I could get on a plane to go home!

I went to every building I had class in and checked their lost and founds. I checked the lost and found of every building anywhere NEAR the path I walked between classes, just in case I had actually lost it at a different place and time than I thought I had. I filed a police report with both the city police and the campus police. No one ever found it.

But I got a call this week. A guy who works in the Eccles Conference Center on campus was cleaning out the safe and my wallet “fell out of it”. I tried to understand from him how my wallet fell out of the safe and how no one could have seen it in there in the intervening 3 years, but he didn’t seem to know. He asked me to verify what might be in there, so I told him the banks I had cards from, my Logan Library card, and identified the wallet. I mentioned that it was very strange since I had lost it 3 years ago and he didn’t believe me. After checking the expiration dates on the cards, he realized I was telling the truth.

He’s sending it to me. How strange is that! I tried to think back. Figure out where I was 3.5 years ago. I had just gotten married, I was in an evening class so I could work as many hours as possible at the library. I was still a year away from a degree and thinking about quitting college to learn welding. God… I feel like a completely different person. It will be interesting to see what emotions and feelings the prodigal wallet will bring with it.

M

Project Revealed

Wow! Thank you so much for the great response to the camisole! I think I may have settled on a name, but I’ll keep the contest open until tomorrow (Thursday) at 5:00 pm Mountain Time. I have to tell you, I keep looking at the pictures and thinking “Wow! I’m hot!” That doesn’t happen often. This camisole has done a lot for my body image! haha!

In the interest of full disclosure, I thought I ought to blog this before I completely finish it.

Ariann Progress

Here is a nearly finished Ariann sweater. I’ve only got the collar left to work, so it really shouldn’t take me much longer. I started it on Tuesday (February 27th) night and worked on it that whole week until the rest of the camisole yarn came, at which point I set it aside. But as soon as the cami was done, I was gleefully knitting Ariann again. It’s so nice to knit something that I don’t have to calculate and rip and that’s not going to be sent away! Very gratifying.

I’m not sure how much time I’ll have to knit today, but I should for sure have an FO by the end of the week. I may even take it out for a proper photo shoot!

M


Check out Liz’s finished Icarus shawl! And make sure you read the whole post. She makes a very convincing argument for knitting shawls even if you never have special occasions.

Kristina finished a lovely Hidcote Shawl in ColourMart Cashmere! It’s so beautiful! Good job Kristina! It makes me want to knit it again!